
Monday, October 17, 2011
More new life for old parts
Sunday, October 16, 2011
New life for old bike parts

Gina picked these tubes up from a local bike shop that had stopped carrying Cannondale. The tubing was used to show the different colors for some model year. My understanding is all they were good for was falling over and making a racket. Now they can just hang around and look nice.
The wheel came off an old rusted to death Huffy, and the whole thing turns around the axle. Other materials include some old chains, 1/8" and 3/16" rolled steel and a piece of 3/16" plate. Now I'm trying to find appropriate old junk parts to make wind cups with so it will spin with the wind. Maybe a couple of old saddles would work.
Tuesday, October 11, 2011
The diet, some background

The "diet" for my car was enforced by Arlen Vanke's shop in Akron.

Akron Arlen was a hero from Ohio back in the day. He did some early work with Pontiac back in their swiss cheese phase, so he was a dietician from way back. But still, to me he'll always be a Mopar racer because that's where he really found fame..

Here's Arlen in recent times, same car, different paint scheme. The paint job shown here was originally done by Greg of Akron and it's a rolling work of art. I'm not sure about that East Town job above, it could be too.

I can't say I'm glad he cut on my car, but like he told me, they were just old race cars back then. The customers wanted fast cars, and light means fast. Another reason to lighten the cars up was to offset the weight of the roll bar that was needed to pass tech at the track. There's at least 100 lbs of steel tubing here left from cutting that thing out.

Speaking of the roll bar ... I found traces of life when I cut the roll bar out of the car. Apparently J. C. Heintz worked for Arlen's shop back in 1978 when the car was prepped..
My A12 fender tag

I reckon the fender tag for my car went in the scrap pile just like all the other metal that was cut off to lighten it. Not having the tag affects the car value. But what can you do? Once lost, it's gone forever.
This is about what it would look like ... even down to the char count ... except there are things there I can't reproduce because they're sequences, etc. so I filled those in the best I could.
I think I'll print one, laminate it, and screw it down to the inner fender where the metal one should be.
Wednesday, October 5, 2011
Planning for my kick panel repair

Here is a place that was cut out as part of the diet and wouldn't have needed to be fixed - but the nut for the dashboard to bolt to is part of the metal that was cut out. So I've got to do something to correct that.
This angle also shows more of the cowl pan modification that I'm correcting.
Also, looking at the floor there you can see the 1/2" holes where the roll bar used to bolt in. There's 4 on each side for 8 total that have to be welded up because they won't be used.

This is the driver's side of that same panel, which is plenty ugly but doesn't need a repair; note the bracket at center with the dashboard nut. Here, I may go ahead and weld in a piece to tie the two parts together at the very top there, but other than that, the work list for this side is clean, grind, clean, treat, clean, clean, and paint.

Returning to the side in need of repair, here it is with a kick panel in the correct place. See how everything would've been hidden?

Here is the look with the full patch lined up and clamped in place. There's a circle around the nut that went missing during the prep work.
(I didn't take a photo with that *and* the kick panel in place, but I should.)
This shows my draft cut lines. I'm replacing the minimum, there is no reason to do more.
Note how the line extends to the lower right so the alignment notch there will be part of the patch. That helps to ensure the patch goes back in straight. Line that up with the matching notch on the car, and it's easy.
The next steps here are to trim out the pinch weld (which has been the right edge of all the photos) on the car where the patch goes . Then I'll drill about 5 5/16" holes the patch along that edge, and plug weld those to the car where I trimmed. The right side will be welded to the existing metal in the same manner. That will provide plenty of support for the dash, and since it is hidden and there is no reason to make more work for myself, it's the best way to go.
Planning for my cowl repair
The reason for my cowl repair is best explained by photos.

First, here's a shot that includes a clear look at the cowl on my car. Notice how nice and flat it is?

So I'm missing a group of louvers, and two holes that the wiper pivots come through. There is actually a reason that was modified. When the car was race prepped, they cut out the underside of the cowl to save weight. The metal they cut out is necessary to support the wiper pivots, and to keep water off the floor. Once that was gone, the louvers had to be smoothed so water wouldn't run straight onto the floor. Since wipers aren't needed on a race car, they also smoothed the wiper holes on the outside. One wiper pivot mount was lost with the metal that was cut out, and a stud for the remaining mount was damaged in the process.

This photo clearly shows where the lower cowl pan has been cut out while also showing what a mess the wiring is right now. The goofy switch and gauge mounting are there so I can start the car without the dash in it.
My current thoughts are to go custom with the repair, and leave the smoothed cowl and as much of the weight loss as possible. Since the car has mini tubs and other race mods, that wouldn't be out of place. Plus, it's been on the car so long I almost feel it'd be a shame to undo that part of it.
The patch panel will be cut from the donor part as was shown above and includes the missing pivot mount. Again, just to the right of the leftmost tape line, at top, you see the alignment feature I mentioned. The panel will be welded in at the windshield pinch and then to the lip which was left at the firewall. I'm unsure right now if the firewall side will be lapped and plug welded, or butted and stitch welded. Probably best to butt it, but OTOH, it should never get wet so there's no worry of having a place for it to rust. Also, since it's steel to steel contact, no corrosive reaction is expected from having the two overlapped pieces.
So ... am I crazy for taking this approach to "restoring" a real A12, or not? Remember, putting the louvers back on the cowl has an impact on what I have to do on the inside, to catch and direct any water that comes through them. Would there really be that much more value in going with the louvers, given the other race mods on the car?

First, here's a shot that includes a clear look at the cowl on my car. Notice how nice and flat it is?

And here's what it should look like. (h/t to amd for the photo)
So I'm missing a group of louvers, and two holes that the wiper pivots come through. There is actually a reason that was modified. When the car was race prepped, they cut out the underside of the cowl to save weight. The metal they cut out is necessary to support the wiper pivots, and to keep water off the floor. Once that was gone, the louvers had to be smoothed so water wouldn't run straight onto the floor. Since wipers aren't needed on a race car, they also smoothed the wiper holes on the outside. One wiper pivot mount was lost with the metal that was cut out, and a stud for the remaining mount was damaged in the process.

This photo clearly shows where the lower cowl pan has been cut out while also showing what a mess the wiring is right now. The goofy switch and gauge mounting are there so I can start the car without the dash in it.
My current thoughts are to go custom with the repair, and leave the smoothed cowl and as much of the weight loss as possible. Since the car has mini tubs and other race mods, that wouldn't be out of place. Plus, it's been on the car so long I almost feel it'd be a shame to undo that part of it.
So what follows shows how I could repair just the bare minimum, adding wipers but leaving the factory louvers smoothed. The plan certainly has flaws - for example, the washer squirts through the louvers, so that is yet to be accounted for.
Now, more pretty photos ...

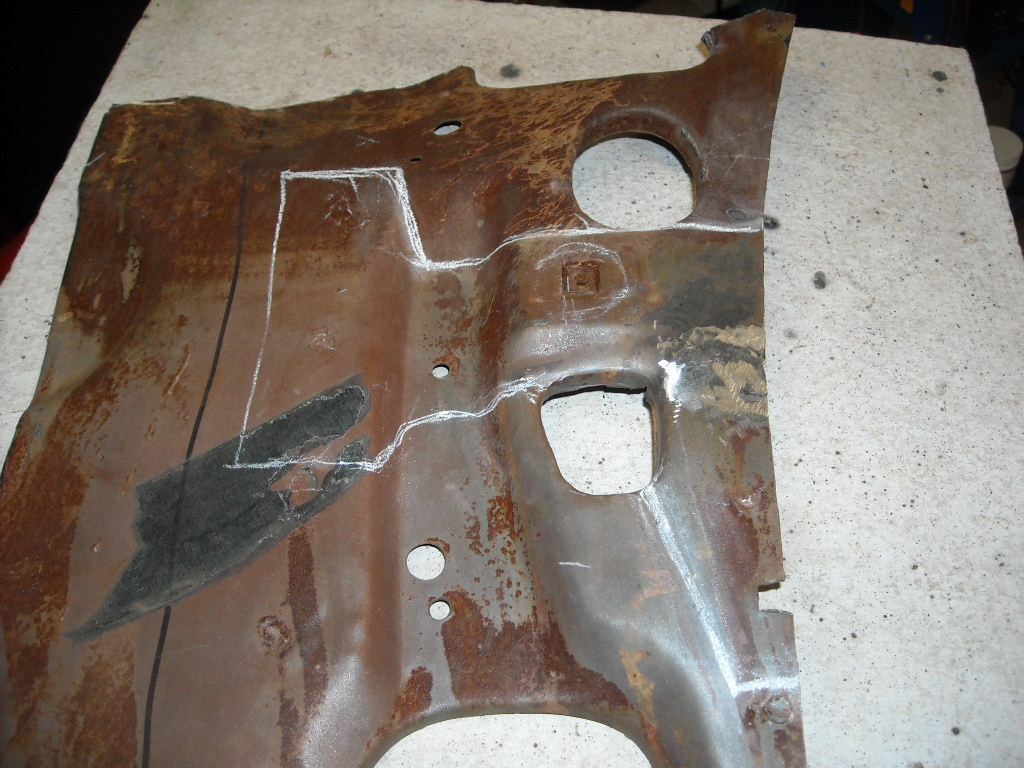
Here you see the draft cut lines on the donor part. Ignore the obvious mismarking there at the bottom. That was caused by it being in the rafters, and me being on a ladder, when it was marked. Not the easiest way to do it, but definitely easier than taking it down from there and then having to put it back (or have it in the way).
Now, more pretty photos ...

Here you see the draft cut lines on the donor part. Ignore the obvious mismarking there at the bottom. That was caused by it being in the rafters, and me being on a ladder, when it was marked. Not the easiest way to do it, but definitely easier than taking it down from there and then having to put it back (or have it in the way).
One thing to note there is the feature just to the right of the leftmost cut line, at top. That indentation will ensure that I get the part back in the right position at the windshield pinch because it has to match up with the same feature stamped into the metal I will be welding it to.

This shows the cowl marked with the basic cut line to just spot the wiper holes back in. It's about 1-3/4" square. The welding here is the only part I don't plan to do because it'd be easy to warp and it shows A LOT. So I think I'll hire it out to the best TIG welder I can find around here. All the rest of the welding will be MIG done by me.


This shows the cowl marked with the basic cut line to just spot the wiper holes back in. It's about 1-3/4" square. The welding here is the only part I don't plan to do because it'd be easy to warp and it shows A LOT. So I think I'll hire it out to the best TIG welder I can find around here. All the rest of the welding will be MIG done by me.

Here, the blue tape represents the area covered by the replacement patch. The contours of the pan are not per the tape. The pan is deeper than that, which will give me room to reach inside it to weld it up at the firewall.
The patch panel will be cut from the donor part as was shown above and includes the missing pivot mount. Again, just to the right of the leftmost tape line, at top, you see the alignment feature I mentioned. The panel will be welded in at the windshield pinch and then to the lip which was left at the firewall. I'm unsure right now if the firewall side will be lapped and plug welded, or butted and stitch welded. Probably best to butt it, but OTOH, it should never get wet so there's no worry of having a place for it to rust. Also, since it's steel to steel contact, no corrosive reaction is expected from having the two overlapped pieces.
So ... am I crazy for taking this approach to "restoring" a real A12, or not? Remember, putting the louvers back on the cowl has an impact on what I have to do on the inside, to catch and direct any water that comes through them. Would there really be that much more value in going with the louvers, given the other race mods on the car?
Thursday, March 18, 2010
Spot Longboard 9 Geometry
Spot took down last year's Longboard-9 geometry page, so here's the data
Spot Longboard 9 geometry | ||||||||
|---|---|---|---|---|---|---|---|---|
| | Small | Medium | Large | XL | ||||
| STAND OVER (mm) | 660* | 713* | 766* | 806* | ||||
| EFFECTIVE TOP TUBE | 559 | 584 | 603.2 | 635 | ||||
| BOTTOM BRACKET DROP (mm) | 64.2 | 64.2 | 64.2 | 64.2 | ||||
| SEAT TUBE (C - C) | 305 | 368 | 432 | 482 | ||||
| HEAD TUBE LENGTH(mm) | 104 | 114 | 120 | 130 | ||||
| HEAD ANGLE | 70.5 | 71 | 71 | 72 | ||||
| SEAT ANGLE | 73.5 | 73 | 72.5 | 73.5 | ||||
| CHAINSTAY (C - C) | 444 | 444 | 444 | 444 | ||||
*note: stand over height taken through the center of bottom bracket to top of top tube. | ||||||||
Subscribe to:
Posts (Atom)